Table of Contents 💡
👋 Great designs start with great feedback. That’s what Workflow is built for. Start today.
Home - UX Portfolio - Tips on presenting your UX case study
Tips on presenting your UX case study
Imagine this. You’ve made it through the first job interview. You’re now asked for a second round interview to show your work. But how do you prepare? And what do you need to keep in mind? Here’s how to present a UX case study during a job interview.
- Updated on August 26, 2024

This article will teach you how to present your UX case study during a job interview. If you follow along, you’ll increase your chances of getting invited to the next round.
We’ll talk about the basics, such as attending the meeting on time, and more advanced tactics, like how you structure your presentation.
I’ve based the following tips on presenting my UX portfolio to multiple potential clients for almost a decade and the UX mentorships I’ve hosted for aspiring designers. In other words, these tips are based on real-world experience.
Table of Contents
How to present a UX case study
The most important part of an excellent UX case study presentation is showing you can solve a business challenge. To be more specific, you have to be able to solve your potential employer’s business challenge.
Even though your primary goal as a UX designer is to be there for the user, you must remember you’re going to work somewhere to help a business make money.
If you only talk about users during your case study presentation and forget to mention how you can help your potential employer grow a business, you’re likely to miss out.
Then, there are several basic job interview rules to consider. Let’s discuss those first.
Presentation basics
These basics are essential. People expect you to follow them. Because of that, doing so will not get you any bonus points. However, failing to follow the basics will leave a bad taste during your interview. Make sure you check the following basics off of your list.
- Arrive on time.
- Dress appropriately (mostly in person).
- Stable internet connection (remote only).
- Position yourself in the middle of your frame (remote only).
- Make sure you’re able to focus without disturbance (remote only).
- Make sure your camera and mic are working correctly (remote only).
Picking the right case study
At some point during your interview, the interviewer will ask you to present your work. This means you have control over the case study you decide to present. And that’s a good thing.
In my experience, there’s always a case study you prefer over your other case studies. Creating that one UX case study has been easier, more recent, or more fun than your other projects.
So make sure you’re ready to pick one of your case studies on the spot if asked to. Pick the one you’re most comfortable with, but also one that aligns with the things your future employer is looking for.
Start with a case study summary
Once you’re asked to present your UX portfolio, most people start to explain their case study from start to finish. Try to stay away from doing that.
First of all, you’ll likely lose your audience’s attention because an ‘and then I did this…’ story isn’t nice to listen to. You’ll also put yourself in a position to receive challenging questions because you gave away all the easy answers during your presentation.
Instead, give a summary first. Here’s what to include.
- The business challenge, your role, and what you were asked to do.
- What your main deliverable was.
- The results of your project and deliverables.
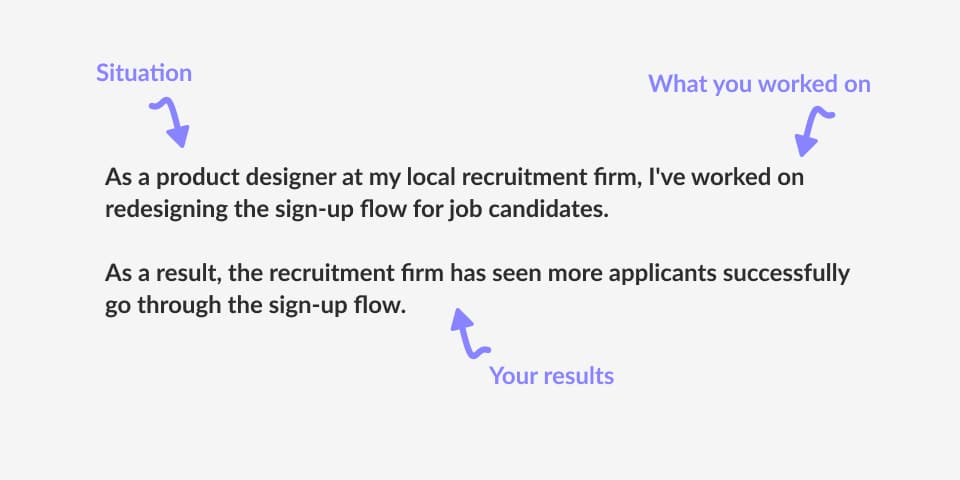
Here’s an example of what your UX case study summary might look like.

The example from the image above is a very specific summary. Presenting this case study summary first allows your audience to ask questions. Because you keep a lot of information to yourself, you’re likely to get questions about that same information. You can answer these questions with ease.
If you had presented every detail of your case study, you’re more likely to get questions you can’t answer.
Answering case study questions
After presenting your UX case study summary, it is time to answer questions. As I said, you leave room for questions on purpose to have more control over the questions you get.
My main advice is to be honest when you don’t have an answer to one of the questions. I’ve seen many designers desperately try to answer every question. However, the people listening to your presentation will notice this.
Instead, be honest when you’re not sure. Let your audience know you’re willing to learn or redirect the question by asking what they think or what the company expects you to do.
That way, you show you know what you can improve and that you’re willing to have a good talk about it. That’s way more valuable than being someone who pretends to know everything.
Frequently asked questions
With the above structure, presenting your UX case study during a job interview should go much better. However, there are still some questions to answer. I’ve collected several in the list below.
How long should a UX case study presentation be?
The length of your case study presentation depends on the structure of the interview. In almost all cases, that’s up to the hiring company. It is common for an interview to take between 30 and 60 minutes.
However, your UX case study presentation can be shorter than that. Those 30 or 60 minutes will likely include the introduction, asking questions, and discussing the next steps. That leaves between 15 and 30 minutes for the actual case study presentation.
How many slides are in a UX case study presentation?
The number of slides in your UX case study can vary between 5 and 15. Less than that would mean you don’t include the basics like the cover page, challenge, things you’ve done during the project, and your results.
However, when you go over 15 slides, you risk losing your audience’s attention. Be strict in the number of slides you include!
What should a UX presentation include?
Your presentation should include at least the main building blocks of your project. These include the business problem you’re solving, what the client has asked you to do, what you actually did, and the impact of your work.
Make your case study presentation very visual with mockups, photos of you working on the project, and a user testimonial from your tests. Before and after images also help you tell a better story.
Resources
UX Case Study (Course + Template)
I’ll walk you through the steps of creating a case study based on my 10 years of experience in UX.
- Video course and template.
- Includes real-world examples.
- Get personal feedback.
Summary
Case studies are what make up most of your UX portfolio. Therefore, being able to present them is a crucial skill you need to have when you want to get hired in UX.
These crucial steps will increase your chances of reaching the next round.
- Get the basics right. Make sure you’re on time, in a place where you can focus, and with a stable internet connection.
- Start with a summary of your case study to leave room for questions you can answer.
- Accept the fact that you can’t answer everything. It is better to acknowledge that than to try and desperately answer every question you get.
👋 Turn good design to great design, with feedback you actually need. Get it on Workflow.

About the author
Hi! I'm Nick Groeneveld, a senior designer from the Netherlands with experience in UX, visual design, and research. I'm a UX coach that supports other designers and have completed design projects in finance, tech, and the public sector.
☎️ Book a 1:1 mentor meeting or let's connect on LinkedIn and Twitter.
(Course) Learn how to create a UX case study within a day


